My Garage
My Account
Cart
Genuine Chevrolet Malibu Balance Shaft Chain
- Select Vehicle by Model
- Select Vehicle by VIN
Select Vehicle by Model
orMake
Model
Year
Select Vehicle by VIN
For the most accurate results, select vehicle by your VIN (Vehicle Identification Number).
2 Balance Shaft Chains found
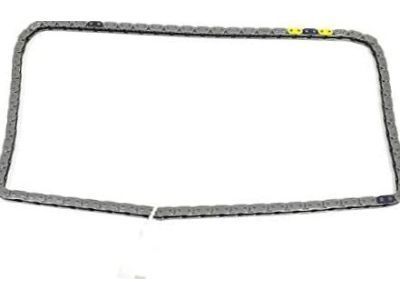
Chevrolet Malibu Chain Assembly, Water Pump & Balancer Shaft
Part Number: 12635427$28.74 MSRP: $47.57You Save: $18.83 (40%)Ships in 1-3 Business Days
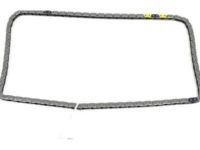
Chevrolet Malibu Balance Shaft Chain
Each OEM Chevrolet Malibu Balance Shaft Chain we offer is competitively priced and comes with the assurance of the manufacturer's warranty for the part. Furthermore, we guarantee the speedy delivery of your orders right to your doorstep. Our hassle-free return policy is also in place for your peace of mind.
Chevrolet Malibu Balance Shaft Chain Parts Questions & Experts Answers
- Q: How to remove and reinstall the Balance Shaft Chain in four cylinder engine on Chevrolet Malibu?A: These are the following processes in removing the components, connect the cable to the negative terminal of the battery and drain the engine oil. Align the engine at Top Dead Centre for cylinder number 1, then remove the Timing Chain, and the guide and sprockets . Finally, remove the balance shaft chain tensioner. Just after the removal insert the special tool no .EN50837 into the lever arm and then rotate the same anti clockwise until the tensioner is compressed. Continue slowly releasing the lever arm and when the lever arm reaches the required position for the tensioner which gives three clicking sound, turn the lever arm clockwise till the holes are inline to lock the tensioner. Take out the balance shaft chain guide bolts and the chain guide, and name 'b' the original bolt for the Crankshaft Pulley, then tighten it. While removing the valve clearance adjustment tool, spin the crankshaft pulley using a special tool to loosen the balance shaft sprocket bolt. Finally having taken out the crankshaft pulley tool, pulley and bolt next, remove the balance shaft sprocket bolt, the crankshaft sprocket the balance shaft chain and having removed the balance shaft sprocket, place the whole assembly aside. Take out all the balance shaft bolts and then lower the balance shaft module from the engine block. Wash down all the parts with the solvent and blowing dry with air compression, check the chain tensioner, the guides for balance shaft chain, the balance shaft chain and the Oil Pump for signs of wear or damage, should they show signs of damage they have to be replaced. If required, fit the oil pump to the balance shaft module and then the balance shaft module assembly can be fitted to the engine and the mounting bolts tightened by hand. Torque the balance shaft module bolts in the sequence to the early torque. Check to make sure that the crankshaft timing keyway has been rotated to TDC before fitting the balance shaft chain on the crankshaft timing chain sprocket with the small colourcoded link in line with the timing mark on the crankshaft sprocket and the other fitted to the timing mark on the balance shaft driven sprocket. Mount the chain and gear assembly with attention to the timing marks being in the correct position. Reinstall the crankshaft pulley and the old bolt for the time being, then torque it properly; then while using a special tool engaging the crankshaft pulley and tightening the new balance shaft sprocket bolt to the required torque. Take out the crankshaft pulley tool, crankshaft pulley and bolt and fit the balance chain guide with the elongated portion towards the crankshaft as before, securing the bolts to the prescribed torque. Ensure fastening of the balance chain tensioner and both the tensioner bolts to the recommended torque. Take out the retaining pin on the tensioner arm and let it go back release the tension to the chain check all balance shaft chain timing marks. Next, fit in the timing chain and timing chain cover, then the upper Oil Pan was then fitted in. The rest of the installation steps are opposite of removal steps are follows. Connect the battery again, change the oil filter, put more oil in the crankcase, add more water in the cooling system and finally start the car and look for any signs of leakage.
Related Chevrolet Malibu Parts
 Chevrolet Malibu Coolant Temperature Sensor
 Chevrolet Malibu Camshaft
 Chevrolet Malibu Control Arm Bushing
 Chevrolet Malibu Camshaft Position Sensor
 Chevrolet Malibu Alternator Bracket
 Chevrolet Malibu Cam Gear
 Chevrolet Malibu Brake Bleeder Screw
 Chevrolet Malibu Balance Shaft Gear
 Chevrolet Malibu Bumper
 Chevrolet Malibu Coolant Filter
Browse by Year
2014 Balance Shaft Chain 2013 Balance Shaft Chain 2012 Balance Shaft Chain 2011 Balance Shaft Chain 2010 Balance Shaft Chain 2009 Balance Shaft Chain 2008 Balance Shaft Chain 2007 Balance Shaft Chain 2006 Balance Shaft Chain 2005 Balance Shaft Chain 2004 Balance Shaft Chain 1999 Balance Shaft Chain 1998 Balance Shaft Chain 1997 Balance Shaft Chain