×
My Garage
My Account
My Cart
This part fits the vehicle you selected:
My Vehicle: 1G1PC5SB7E7178755 2014 Chevrolet Cruze 4 Cyl 1.4L MFI, DOHC, Turbo, VVT, ALUM; 6-Speed Automatic Transmission, HMD, X23F; Cruze LT / LTZ 4 Door Notchback
Change VehicleThe location this part fits:
- Passenger Side
- Fitting Vehicle Options: PL69(LUV,MH8,GNA,GNG,Z54)
GM 23483697 Front Suspension Strut Assembly
2011-2016 Chevrolet Cruze
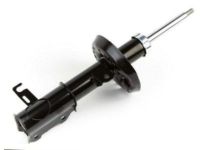


- Part DescriptionStrut Assembly, Front Suspension
- PositionFront
- Replaces13354010, 20963830, 22851370, 22742127, 23447422, 13354028
- ManufacturerGeneral Motors
This part fits the vehicle you selected:
1G1PC5SB7E7178755 2014 Chevrolet Cruze 4 Cyl 1.4L MFI, DOHC, Turbo, VVT, ALUM; 6-Speed Automatic Transmission, HMD, X23F; Cruze LT / LTZ 4 Door Notchback
The location this part fits:
- Passenger Side
- Fitting Vehicle Options: PL69(LUV,MH8,GNA,GNG,Z54)
$107.25 MSRP: $350.84 1
You Save: $243.59 (70%)
Ships in 1-2 Business Days
Product Specifications
| Brand | Genuine GM |
| Manufacturer Part Number | 23483697 |
| Part Description | Strut Assembly, Front Suspension |
| Other Names | Strut |
| Item Dimensions | 24.7 x 8.0 x 8.2 inches |
| Item Weight | 10.70 Pounds |
| Position | Front |
| Condition | New |
| Fitment Type | Direct Replacement |
| Replaces | 13354010, 20963830, 22851370, 22742127, 23447422, 13354028 |
| Manufacturer | General Motors |
| SKU | 23483697 |
| Warranty | This genuine GM part is guaranteed by GM's factory warranty. |
| Shipping & Return | Shipping Policy Return Policy |
Warning: California’s Proposition 65
Customer Questions & Answers
- Q:I would like to confirm if this is the correct part number for my vehicle. Please advise. Thank you. Posted by GMPartsGiant Specialist
- A:You can Select Your Vehicle to check if 23483697 fits your vehicle.Posted by GMPartsGiant Specialist
- Q:How do you remove the rear Shock Absorber? Posted by Customer
- A:To remove the rear wheels, start by loosening the lug nuts and blocking the front wheels to prevent the vehicle from rolling. Then, raise the rear of the vehicle and secure it on jackstands. Once the vehicle is properly supported, remove the rear wheels. Next, use a floor jack to support the rear axle on the side you are working on, positioning the jack head under the coil spring pocket. Proceed to remove the shock absorber upper and lower mounting bolts. Take a close look at the shock for any signs of fluid leakage or damage to the shock body. Test the operation of the shock by moving the damper shaft through a full stroke and short strokes of 2 to 4 inches. The resistance should be smooth and continuous; if it is jerky or uneven, or if there is any visible wear or damage, the shock needs to be replaced. To install the shock, simply reverse the removal steps, using new bolts and tightening them to the proper torque.Posted by GMPartsGiant Specialist
- Q:How do you replace the Coil Springs and Shock Absorber? Posted by Customer
- A:If the struts or coil springs show signs of wear such as leaking fluid, loss of damping capability, or chipped, sagging, or cracked coil springs, it is important to explore all options before starting any work. These components are not serviceable and must be replaced if a problem arises. However, there may be the option to replace the entire strut assembly with springs on an exchange basis, which can save time and effort. Before disassembling the vehicle, it is recommended to check the cost and availability of parts. To disassemble, the strut and spring assembly should be removed and the upper strut cap cover should be unbolted to expose the damper shaft nut. A spring compressor should be used to relieve pressure from the upper spring seat, and the damper shaft nut should be unscrewed while holding the strut rod with a 45 Torx bit. The nut and upper mount and bearing should be removed and laid out in the order they were removed. The rubber portion of the upper mount should be checked for cracking and deterioration, and replaced if necessary. The upper spring seat should be removed from the damper shaft and the rubber portion should be inspected for cracking and hardness. The bearing in the spring seat should also be checked for smooth operation. The rubber bump stop should be slid off the damper shaft and checked for deterioration. The compressed spring should be carefully lifted from the assembly and set aside. To reassemble, the damper shaft should be extended and the rubber bump stop should be installed. The compressed coil spring should be placed onto the lower seat of the damper, with the end of the spring resting against the raised stop. The bearing and upper insulator/spring seat should be installed, followed by the upper mount and damper shaft nut, which should be tightened to the proper torque specifications. The spring compressor tool can then be removed, and the strut/spring assembly can be installed.Posted by GMPartsGiant Specialist
- Q:How do you remove the front Shock Absorber? Posted by Customer
- A:To remove the strut, start by loosening the wheel lug nuts and raising the vehicle on jackstands. Remove the wheel and disconnect the stabilizer bar link and brake hose from the strut. Mark the relationship of the strut to the knuckle and remove the strut-to-knuckle nuts. Separate the strut from the steering knuckle, being careful not to overextend the inner CV joint. Remove the strut nut protective cap and use a Torx-bit and ratchet to hold the strut damper shaft while removing the strut-to-body nut. To inspect the strut, check for leaking fluid, dents, cracks, and other damage. Also, inspect the coil spring for chips or cracks and the spring seat for cuts or deterioration. If any issues are found, proceed to the strut disassembly procedure. To install the strut, guide the assembly into the fender well and align it in the shock tower. Install the mounting nut to secure the strut. Slide the steering knuckle into the strut flange and insert the bolts, aligning the marks. Reattach the brake hose and stabilizer bar link. Install the wheel, lower the vehicle, and tighten the lug nuts. Finally, tighten the upper mounting nut and have the front wheel alignment checked and adjusted if necessary.Posted by GMPartsGiant Specialist
If you have any questions about this product, please don't hesitate to ask us. We will be happy to help you!
Why choose GM Parts Giant
- Dedicated Service
Your complete satisfaction is our #1 goal
- Lowest Prices
Best deals on genuine OE parts from dealerships
- Fast Delivery
Orders are processed and delivered promptly