×
My Garage
My Account
My Cart
This part fits the vehicle you selected:
My Vehicle: 1G1PC5SB7E7178755 2014 Chevrolet Cruze 4 Cyl 1.4L MFI, DOHC, Turbo, VVT, ALUM; 6-Speed Automatic Transmission, HMD, X23F; Cruze LT / LTZ 4 Door Notchback
Change VehicleThe vehicle options this part fits:
- Fitting Vehicle Options: PL69(LUV)(EXC NL6)
GM 13510671 Fuel Tank Fuel Pump Module Kit (W/O Fuel Level Sensor)
2011-2019 GM
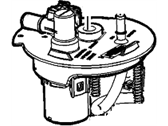

- Part DescriptionModule Kit, F/Tnk F/Pmp (W/O Fuel Lvl Se
- Replaces13579908
- ManufacturerGeneral Motors
This part fits the vehicle you selected:
1G1PC5SB7E7178755 2014 Chevrolet Cruze 4 Cyl 1.4L MFI, DOHC, Turbo, VVT, ALUM; 6-Speed Automatic Transmission, HMD, X23F; Cruze LT / LTZ 4 Door Notchback
The vehicle options this part fits:
- Fitting Vehicle Options: PL69(LUV)(EXC NL6)
$269.16 MSRP: $565.45 1
You Save: $296.29 (53%)
Ships in 1-2 Business Days
Product Specifications
| Brand | Genuine GM |
| Manufacturer Part Number | 13510671 |
| Part Description | Module Kit, F/Tnk F/Pmp (W/O Fuel Lvl Se |
| Other Names | Fuel Pump, Fuel Pump Assembly |
| Item Dimensions | 13.5 x 13.0 x 10.8 inches |
| Item Weight | 3.20 Pounds |
| Condition | New |
| Fitment Type | Direct Replacement |
| Replaces | 13579908 |
| Manufacturer | General Motors |
| SKU | 13510671 |
| Warranty | This genuine GM part is guaranteed by GM's factory warranty. |
| Shipping & Return | Shipping Policy Return Policy |
Warning: California’s Proposition 65
Customer Questions & Answers
- Q:I am wonder if this is complete and correct part for my vehicle. Posted by GMPartsGiant Specialist
- A:You can Select Your Vehicle to check if 13510671 fits your vehicle.Posted by GMPartsGiant Specialist
- Q:How can I check the operation of the fuel pump? Posted by Customer
- A:To check the fuel pump operation, you can listen for the brief sound it makes when the ignition key is turned to the ON position, pressurizing the fuel system before starting the engine. If you can't hear the pump, you can remove the fuel filler cap, depress the spring-loaded door inside the fuel filler neck, and have an assistant turn the ignition switch to ON while you listen for the pump operating for a couple of seconds. If the pump doesn't come on, you should check the fuel pump fuse and relay in the engine compartment fuse and relay box, and inspect the wiring back to the fuel pump. If those components are in working order and the pump still doesn't run, it's likely defective. However, if the pump runs continuously with the ignition key in the ON position, the Powertrain Control Module (PCM) may be defective and should be checked by a qualified repair shop. To perform a fuel pressure check, you should locate the Schrader valve test port on the fuel rail (on 2016 and later models, high-side fuel pressure can only be checked with a scan tool). Relieve the fuel pressure and ensure the bleeder valve on the fuel pressure gauge is closed. On 2016 and later models, relieve the fuel system pressure, disconnect the low-pressure fuel feed line from the high-pressure fuel pump, and tee-in the fuel pressure gauge with the appropriate adapter. Turn the ignition key to the On position, note the gauge reading as the pressure stabilizes, and compare it to the specifications. If the pressure is not within the specified range, you should check for fuel system restrictions and replace the fuel pump module as needed. Additionally, you should ensure the pressure drops below 87 psi after turning the ignition off and that it doesn't lose more than 5 psi in one minute; if it does, it could indicate a leaky fuel injector or a faulty fuel pump module. Finally, start the engine, check the pressure, and replace the fuel pump module if necessary, ensuring there are no fuel leaks when you're done.Posted by GMPartsGiant Specialist
- Q:How do you remove the fuel rail fuel pressure sensor and high-pressure fuel pump for Chevrolet Cruze? Posted by Customer
- A:To remove the Fuel Pressure Sensor, start by removing the oil filler cap and engine cover fasteners. Lift the engine cover and valve cover insulator off of the valve cover and reinstall the oil filler cap. Relieve the fuel system pressure and disconnect the cable from the negative battery remote terminal. Disconnect the Fuel Pressure Sensor electrical connector and unscrew and remove the sensor from the fuel rail. Clean the threads in the fuel rail and apply a drop of oil on the new sensor threads before installing it. Remove the sensor again, apply another drop of clean engine oil on the threads, and reinstall it. Connect the sensor electrical connector and reverse the removal process. To remove the high-pressure fuel pump, start by removing the charge air cooler outlet hose. Disconnect the harness connector to the fuel rail and the harness connector from the camshaft position sensor. Unclip the wiring harness retainers and move the harness and connectors out of the way. Remove the sound insulator around the pump body. Unscrew the intermediate high-pressure line fittings between the fuel rail and fuel pump and remove the fuel line bracket bolt. Remove the wiring harness bracket mounting bolts and move the bracket out of the way. Disconnect the electrical connector from the high-pressure fuel pump and disconnect the low-pressure feed line quick-connector at the pump. Remove the low-pressure fuel feed line. Remove the high-pressure fuel pump bolts and remove the pump, gasket, and lifter follower. Lubricate the lifter follower with clean engine oil and install it into the bore in the cylinder head. Install the alignment gauge and rotate the engine until the gauge sits flush with the cylinder head. Remove the alignment gauge and, if necessary, the valve lifter follower. Lubricate the pump valve lifter follower with engine oil and insert it into the bore. Set the pump into position on the bore using a new O-ring gasket and tighten the bolts evenly. The remainder of the installation is the reverse of the removal process. Reconnect the cable to the negative battery remote terminal, start the engine, and check for fuel leaks.Posted by GMPartsGiant Specialist
- Q:How to remove and install a fuel pump/fuel level sending unit module? Posted by Customer
- A:Disconnect the cable from the negative battery terminal. Relieve the system fuel pressure. Remove the fuel tank. Disconnect the fuel supply line, vent line and electrical connectors from the fuel pump/fuel level sending unit module. Use a shop rag to soak up any spilled fuel. Using a pair of large water pump pliers, unscrew the fuel pump/fuel level sending unit module lock ring by turning it counterclockwise. If the lock ring is tight, use a hammer and a brass punch to loosen it. Be careful not to distort the lock ring, or it will have to be replaced. Note the orientation of the fuel pump in relation to the fuel tank to ensure that the fuel pump is correctly realigned when you install it again. Remove the fuel pump/fuel level sensor module, taking care not to damage the fuel level sensor float arm and float. Before installing the pump, inspect the pump-to-tank seal. It's recommended to replace the seal whenever the module has been removed. Installation is the reverse of removal. Align the fuel pump/fuel level sending unit module with its hole in the tank and carefully insert it into the tank, then align the marks noted earlier. Make sure that you don't damage the fuel inlet strainer, the float arm or the float during installation. If the float arm is bent, the fuel level that is indicated on the fuel level gauge on the instrument cluster will be incorrect. Whenever the battery has been disconnected, the Powertrain Control Module (PCM) must relearn its former driveability and performance characteristics.Posted by GMPartsGiant Specialist
If you have any questions about this product, please don't hesitate to ask us. We will be happy to help you!
Why choose GM Parts Giant
- Dedicated Service
Your complete satisfaction is our #1 goal
- Lowest Prices
Best deals on genuine OE parts from dealerships
- Fast Delivery
Orders are processed and delivered promptly