My Garage
My Account
Cart
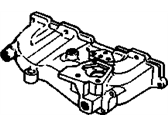
Genuine Oldsmobile Omega Intake Manifold
Engine Intake Manifold- Select Vehicle by Model
- Select Vehicle by VIN
Select Vehicle by Model
orMake
Model
Year
Select Vehicle by VIN
For the most accurate results, select vehicle by your VIN (Vehicle Identification Number).
1 Intake Manifold found
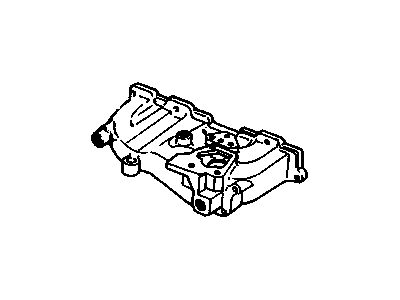
Oldsmobile Omega Intake Manifold
Each OEM Oldsmobile Omega Intake Manifold we offer is competitively priced and comes with the assurance of the manufacturer's warranty for the part. Furthermore, we guarantee the speedy delivery of your orders right to your doorstep. Our hassle-free return policy is also in place for your peace of mind.
Oldsmobile Omega Intake Manifold Parts Questions & Experts Answers
- Q: What steps should be followed when removing and replacing the intake manifold in V6 engine on Oldsmobile Omega?A: If the engine has been removed from the car, disregard the following steps which do not apply. First, if the vehicle is equipped with air conditioning, carefully examine the routing of the A/C hoses and the mounting of the compressor, as it may be possible to remove the intake manifold without disconnecting the A/C system; if in doubt, consult a certified dealer or refrigeration specialist to have the system depressurized, and do not disconnect the A/C hoses while the system is under pressure. Next, disconnect the negative battery cable and drain the coolant from the radiator. Remove the air cleaner assembly, noting the position of all hoses and pipes, then disconnect the upper radiator hose and the heater hose from the intake manifold. Disconnect the accelerator linkage at the carburetor, ensuring any supporting bracket on the manifold is also removed. With a container handy to catch any spillage, disconnect the fuel inlet hose at the carburetor, plugging the end to prevent dirt from entering the system and excessive fuel seepage. Disconnect all other hoses connected to the carburetor, identifying each hose with strips of numbered tape to prevent confusion upon reassembly. Remove the distributor, ensuring the distributor cap with spark plug wires is taped or wired out of the way, and then remove both rocker arm covers. Disconnect the vacuum hose leading to the power brake booster if equipped, and remove any accessory brackets attached to the intake manifold. Remove the external EFE pipe from the rear of the manifold, followed by the intake manifold-to-Cylinder Head attaching bolts. Lift the manifold, complete with carburetor, free from the engine without prying on the mating surfaces to avoid damage. If replacing the intake manifold, transfer all components that have not yet been removed, including the carburetor and its attaching bolts or studs, temperature or oil pressure sending unit, heater hose and water pump hose adapter fittings, EGR valve with a new gasket, emission system TV switches, and carburetor choke assembly. Before installing the manifold, place clean lint-free rags in the engine cavity and thoroughly clean the engine block, cylinder heads, and manifold gasket surfaces, ensuring all extra gasket material and sealing compound are removed. Clean the sealing surfaces of the cylinder case's front and rear ridges with degreaser, then apply a 3/16 in (5 mm) diameter bead of RTV or equivalent sealant on each ridge. Install the new intake gaskets on the cylinder heads, ensuring the correct gasket is used for each head, and hold the gaskets in place by extending the bead of RTV onto the gasket ends. Carefully lower the intake manifold into position, ensuring the gaskets are not disturbed, then install the intake manifold mounting bolts and tighten them in sequence, gradually torquing them to specifications. Finally, install the remaining components in the reverse order of removal, fill the radiator with coolant, start the engine, check for leaks, and adjust the ignition timing and carburetor idle speeds as necessary.