Chevrolet Corvette Parts
- Select Vehicle by VIN
- Select Vehicle by Model
For the most accurate results, search by your VIN (Vehicle Identification Number).
Why choose GMPartsGiant
- Large Inventory
The best site to buy Chevrolet Corvette genuine parts for years has been GMPartsGiant.com. We're the best online parts and accessory store for your Chevrolet Corvette. GMPartsGiant.com offers a large parts and accessory inventory to cover all your vehicle's repairs. Feel free to browse through our genuine Chevrolet Corvette parts and accessory catalog to find all your vehicle's needs.
- Fast Shipping Times
All of our Chevrolet Corvette auto parts and accessories are expedited directly from verified dealers and backed by the manufacturer's warranty. Our experienced team ensures the orders are packed to provide quick transit times. The majority of the orders are shipped out within a couple of business days to get the parts out to you as fast as possible.
- Low Prices
Our low prices say it all. You can rest assured that you will always receive unbeatable prices on OEM Chevrolet Corvette parts. Our giant inventory is beyond compare and has everything you need at an extraordinary value not found anywhere else. Whether you're restoring an old vehicle or upgrading the performance of your vehicle you can count on the quality of our products without hurting your bank account.
Popular Genuine Chevrolet Corvette Parts
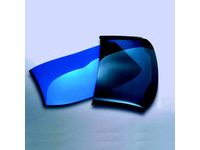
- Engine Parts View More >
- Front Suspension, Steering Parts View More >
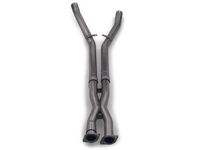
- Fuel System, Exhaust, Emission System Parts View More >
- Brakes Parts View More >
- Transmission - Automatic Parts View More >
- Frames, Springs, Shocks, Bumpers Parts View More >
- Cooling System, Grille, Oil System Parts View More >
- Front End Sheet Metal, Heater Parts View More >


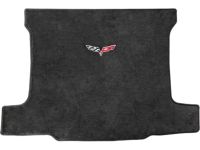
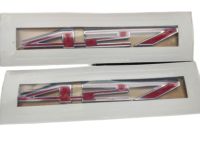
Genuine Chevrolet Corvette Accessories
Shop Genuine Chevrolet Corvette Parts with GMPartsGiant.com
The Chevrolet Corvette is a two-door, luxury sports car renowned for its powerful engines and responsive transmissions. With over 60 years of production, the Corvette boasts eight generations, from C1 to C8, each offering various engine options, including the mid-mounted 6.2-liter V8 engine in the latest 2022 models. Each Corvette model is equipped with an eight-speed automatic transmission that ensures thrilling acceleration and smooth shifts, pushing the car from 0 to 60 mph in just 3.3 seconds. Notably, from 2020, the Corvette shifted to a mid-engine layout, a marked departure from the front-engined design used from 1953 to 2019. Fuel economy is also commendable, with an EPA-estimated 19 mpg and up to 27 mpg on the highway. Measuring 4475mm in length, 1928mm in width, and 1237mm in height, the Corvette blends performance with practicality. The car offers ample interior space, with the trunk holding a couple of grocery or golf bags comfortably. Despite its sporty nature, the Corvette guarantees a comfortable ride over various road surfaces, smoothing out bumps effectively. However, tire noise can be slightly prominent on rough surfaces. Overall, the Chevrolet Corvette is a highly regarded sports car that offers high performance, practicality, and reliability, making it a favorite among driving enthusiasts.
Despite the Chevrolet Corvette's reputation as a high-performance sports car, owners have reported common issues. One prevalent complaint is about odd noises heard while driving, including rattling and squeaking from underneath the vehicle. These sounds, particularly noticeable when driving over bumps or making aggressive turns, might indicate a faulty sway bar bushing or rod bearing. Another commonly reported issue is difficulty starting the vehicle. This problem often manifests as engine misfiring, hard starts, or slow responses when accelerating, possibly due to a defective spark plug or issues with the automatic transmission shifter. Regular maintenance is essential to mitigate these issues, with particular attention to the replacement of components prone to wear. For instance, a malfunctioning seat belt can pose a serious risk during emergency braking, and should be replaced promptly when its operation appears compromised.
OEM parts are engineered to comply with official Chevrolet factory standards, guaranteeing easy installation and an impeccable fit. Should you need to purchase new auto parts, such as Body Moldings, Sheet Metal, Rear Compartment Hardware, Roof Hardware, Transmission - Manual for your vehicle, we strongly suggest you consider the genuine Chevrolet Corvette parts, including Folding Top, Interior Trim, Front Seat Trim, Seat Belts, Rear Glass, Seat Parts, Adjuster available on GMPartsGiant.com. Our OEM Chevrolet Corvette parts come with the reassurance of the manufacturer's warranty, a hassle-free return policy, and speedy delivery service, all at the most affordable prices online. Feel free to shop with confidence!
Chevrolet Corvette Parts Questions & Answers
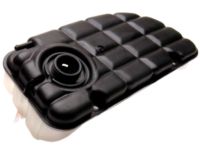
- Q: How do you remove the cooling system expansion tank on Chevrolet Corvette?A: To remove the cooling system expansion tank, start by draining the engine coolant. Then, remove the fasteners and detach the hoses connected to the expansion tank. Clean the reservoir with soapy water and a brush to remove any deposits and inspect it for cracks. If any cracks are found, replace the reservoir. For installation, simply reverse the removal steps and refill the cooling system. For the removal of the Charge Air Cooler (CAC) reservoir in LS9 engines, begin by loosening the left front wheel lug nuts and raising the vehicle securely on jackstands. Remove the wheel and the passenger's side inner fender splash shield. Drain the cooling system and locate the quick-connect fittings for the charge air cooler reservoir hoses. Use a screwdriver or pick to pull on the open ends of the retaining rings and rotate them around the quick-connector until they can be removed. Separate the hoses from the fittings. Remove the reservoir fasteners and be prepared for coolant spillage. Clean the reservoir with soapy water and a brush, inspecting it for cracks and replacing it if necessary. To install, reverse the removal steps, refill the cooling system, and bleed the charge air cooler.
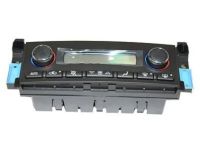
- Q: How do you remove the heater/air conditioner control module?A: When replacing the A/C switch, it is important to disconnect the cable from the negative battery terminal and remove the center console. Remove the screws mounting the A/C switch panel to the instrument panel. Then, pull the switch out, disconnect the electrical connectors, and remove the A/C switch from the panel. Installation is the reverse of removal.
- Q: How to remove fuel injectors and Fuel Rail on Chevrolet Corvette?A: We shall remove the fuel injectors by first of all reducing the pressure within the system and cutting off the cable from the battery. Detach engine cover(s) and disconnect fuel supply line at fuel rail. On supercharged models, unscrew fasteners that keep manifold attached to the front of charge air cooler and unplug fuel injection electrical connectors, MAP, IAT, supercharger air output sensors connectors, PCV tube and ignition coil electrical connectors. For non-supercharged models, undo electrical connecters for each injector. Clear intake manifold or supercharger where injectors are inserted. Remove fuel rail fasteners as well as fuel rail assemblies. Take off each injector's electrical connector from a supercharged model. Stroke out injector retaining clips backwards so that injectors can be pulled out from a rail of fuels. Tear o-rings away from injectors. Spread clean engine oil on new O-rings then place them over every one of these components in question in those fuel delivery systems' wires. Now put each individual injector into its respective bore where it is mounted in a fuel track while securing with an injecting loop which prevents them against falling down or getting lost somewhere nearby this area after installation has been made which would lead to a fire accident because there were possibilities if any remaining combustible gas escaped through this small opening especially during transportation related activities involving other parts like gasoline tanks containing compressed natural gasses (CNG). Reattach cable back onto negative terminal of battery then switch ignition key to ON position thus activating pump before searching for places where leakage might have happened.
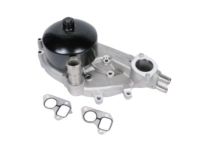
- Q: How do I remove the water pump?A: To remove the water pump, start by disconnecting the cable from the negative battery terminal and removing the engine cover(s). Then, raise the vehicle and support it securely on jackstands. Drain the cooling system and remove the drivebelts, air filter housing, and air intake duel/resonator. On non-supercharged models, remove the drivebelt tensioner and idler pulley, while on supercharged models, remove the supercharger belt tensioner and bracket. Disconnect and remove the hoses from the water pump, and if necessary, remove the water pump pulley. Finally, unbolt and remove the water pump from the front of the engine. To install the new water pump, remove any old gaskets and compare them to the new ones for accuracy. Apply a thin film of RTV sealant to hold the new gasket in place, and coat O-rings with clean coolant. Install the water pump bolts and tighten them to the specified torque. The remaining steps are the reverse of removal, including refilling the cooling system and operating the engine to check for leaks.