Buick Rainier Parts
- Select Vehicle by VIN
- Select Vehicle by Model
For the most accurate results, search by your VIN (Vehicle Identification Number).

Why choose GMPartsGiant
- Large Inventory
The best site to buy Buick Rainier genuine parts for years has been GMPartsGiant.com. We're the best online parts and accessory store for your Buick Rainier. GMPartsGiant.com offers a large parts and accessory inventory to cover all your vehicle's repairs. Feel free to browse through our genuine Buick Rainier parts and accessory catalog to find all your vehicle's needs.
- Fast Shipping Times
All of our Buick Rainier auto parts and accessories are expedited directly from verified dealers and backed by the manufacturer's warranty. Our experienced team ensures the orders are packed to provide quick transit times. The majority of the orders are shipped out within a couple of business days to get the parts out to you as fast as possible.
- Low Prices
Our low prices say it all. You can rest assured that you will always receive unbeatable prices on OEM Buick Rainier parts. Our giant inventory is beyond compare and has everything you need at an extraordinary value not found anywhere else. Whether you're restoring an old vehicle or upgrading the performance of your vehicle you can count on the quality of our products without hurting your bank account.
Popular Genuine Buick Rainier Parts
- Engine Parts View More >
- Fuel System, Exhaust, Emission System Parts View More >
- Brakes Parts View More >
- Transmission - Automatic Parts View More >
- Frames, Springs, Shocks, Bumpers Parts View More >
- Cooling System, Grille, Oil System Parts View More >
- Front Axle, Front Suspension, Steering Parts View More >
- Front End Sheet Metal, Heater Parts View More >


Genuine Buick Rainier Accessories

Shop Genuine Buick Rainier Parts with GMPartsGiant.com
The Buick Rainier, designed by Bill Davis, is a mid-size luxury SUV that was manufactured from 2004 to 2007. Its standout features include a robust powertrain, a quiet ride, ample space, and a commanding road presence. Assembled at Moraine Assembly in Moraine, Ohio, the Rainier is available in two trim levels: CXL and CXL Plus, both offering a sophisticated interior adorned with leather upholstery, simulated wood accents, power front seats, and dual-zone automatic climate control. It also boasts a complete in-car entertainment system with Bose premium brand speakers. Two engine options were available, the standard 4.2L Vortec I6 and the more powerful 5.3L Small-block V8, the latter unique to the Rainier during its debut year. These engines contribute to the SUV's solid performance, with the V8 variant achieving 0-60 mph in 7.6 seconds. In addition to power and comfort, safety is a key attribute of the Rainier. Features such as all-disc antilock brakes, GM's StabiliTrak electronic stability system, and optional side curtain-type airbags with rollover sensing system for 2006 model ensure a secure ride. The 2007 model received the highest NHTSA rating for side-impact testing when equipped with the side curtain airbag. Overall, the Buick Rainier, with its robust construction and premium OEM parts, offers an exceptional blend of performance, comfort, and safety.
The Buick Rainier faces several distinct technical issues. Firstly, the air conditioning system has concerns mainly with its blower motor, which circulates air. Failures can be attributed to blown fuses, malfunctioning relays, and defective resistors. Often, a disrupted airflow, even with functioning dashboard operations, points to the blower motor. Reduced AC cooling can be due to refrigerant leaks, unclean evaporators, or condenser issues. Both blend door actuators, which balance AC and heater air, and cooling fans, which cool the condenser, can also present problems. Secondly, there's the "New Engine Won't Turn Over" challenge, which is frequently due to a weak battery. Yet, it can also be attributed to unsatisfactory battery connections, corroded starter motor power cables, flawed ground connections, or malfunctioning starter motors. In certain instances, engine failure is observed, necessitating comprehensive diagnosis, which can include checking battery voltage, OBD II scans, and inspecting various engine parts. Thirdly, there's a problem specifically with the 2005 Buick Rainier AWD model where the front differential or transfer case locks up during reverse with turned wheels. This is generally attributed to aged transfer case fluid, with changing to AUTO TRAK II fluid being a suggested remedy. Driving approximately 50 miles after this fluid change usually rectifies the problem. If not resolved, deeper transfer case problems or front axle malfunctions may be at fault. Issues related to the encoder motor can also be factors, with specific brands noted for their durability.
OEM components are subjected to rigorous quality control assessments, ensuring their superior quality and resilience. Here on our website, we provide the most competitively priced genuine Buick Rainier parts, including Rear Body Structure, Moldings & Trim, Cargo Stowage, Transfer Case you can find. Our OEM Rainier parts are backed by the manufacturer's warranty. Additionally, all orders placed with us benefit from our hassle-free return policy and swift delivery service.
Buick Rainier Parts Questions & Answers
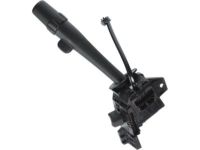 Switch,Turn Signal & Headlamp Dimmer Switch & Windshield Wiper & Windshield Washer(W/Lever)
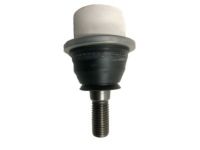
12450067Q: How do you remove the multi-function switch?A: The turn signal switch is located on the left side of the steering column. It incorporates the turn signal, headlight dimmer, windshield wiper/washer and, if equipped, cruise control functions into one switch. To remove it, first place the tilted steering wheel in the center position. Then, remove the steering column trim covers. Trace the turn signal switch wires down to the connectors and disconnect them. Remove the turn signal switch screws, then detach the switch from the steering column. To install, simply reverse the removal process.- Q: How to inspect and replace control arm ball joints?A: To inspect the control arm ball joints for looseness, separate them and try turning the ball stud in its socket by hand. If it is loose or can be turned, the ball joint needs to be replaced. Next, raise the front of the vehicle and support it securely on jack stands under the frame rails. Place a floor jack under the lower control arm and slightly raise it, ensuring the floor jack is not under the steering knuckle. Check for looseness in the front wheel bearings. For 4WD models, set up a dial indicator to measure the vertical movement of the wheel. Insert a pry bar between the lower control arm and the wheel bearing outer race, prying them apart and noting the reading on the dial indicator. If it exceeds 0.125-inch, replace the ball joint. When removing the ball joint, remove the lower control arm for the lower ball joint or the steering knuckle for the upper ball joint. Take the control arm or steering knuckle to have the old ball joint pressed out and the new one pressed in. Finally, install the control arm or steering knuckle and have the front-end alignment checked and adjusted if necessary.
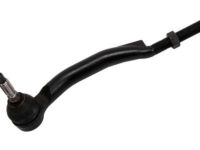
- Q: How do you remove the tie-rod end?A: To remove the tie-rod end, start by loosening the wheel lug nuts and raising the front of the vehicle. Support it securely on jackstands and apply the parking brake. Block the rear wheels to prevent the vehicle from rolling. Remove the wheel and measure the length of exposed threads on the tie-rod end. Write down this measurement and then break loose the tie-rod end jam nut. Loosen the nut on the tie-rod end ball stud, but do not remove it. Use a puller to break loose the tie-rod end from the steering knuckle arm. Remove the nut and detach the tie rod end from the steering knuckle. Unscrew the tie rod end from the tie rod. To install the new tie-rod end, thread the new jam nut onto it so that the same length of threads is exposed. Connect the tie-rod end to the steering knuckle arm and install the nut on the ball stud. Tighten it to the specified torque. Securely tighten the jam nut and install the wheel. Lower the vehicle and tighten the lug nuts to the specified torque. Finally, have the front-end alignment checked and adjusted if necessary.
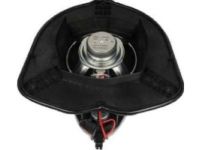
- Q: How do you remove a radio and replace a speaker in Chevrolet Trailblazer and Buick Rainier?A: To remove the radio, start by disconnecting the negative battery cable. If you're working on a Chevrolet model, remove the lower center insulator panel from the instrument panel. Then, remove the accessory trim plate from the instrument panel on all models. Next, remove the mounting screws, pull the radio out of the instrument panel, disconnect the connectors, and finally remove it from the vehicle. To install the radio, simply follow the reverse steps of the removal process. To replace a door speaker, remove the door trim panel. For a front dash-top speaker, remove the instrument panel upper trim pad. Remove the speaker mounting screws, pull the speaker out, disconnect the electrical connector, and remove the speaker from the vehicle.